How to Verify Your Coins.ph Account
Is your Coins.ph account already verified? In this post of The Wise Coin, I’m going to show you the steps on how to verify your Coins.ph account.
When I registered to Coins.ph, I was hoping that I could use its basic features such as cashing in, loading to my mobile phone, or paying bills.
However, to my surprise, I wasn’t able to do these basic tasks. The features of the app are inaccessible to me unless I get verified.
As I mentioned in my first blog post on Coins.ph, I think the selfie verification will give more security for all users of the app (although somewhat restrictive).
All users will be identified with the information saved in their database – a simple deterrent for some people who may want to use the app unlawfully.

Before we proceed with this guide, please note that Coins.ph has several verification levels:
- Email or phone verification for Level 1
- ID and Selfie verification for Level 2
- Address verification for Level 3
- Additional verification for Level 4
This guide is specifically about Level 2 verification. This is just the right level for us to avail of the app’s various features. What is Coins.ph Level 2 Verification?
Level 2 verified accounts have a cash-in limit of Php 50,000 per day, 100,000 per month, and 400,000 per year. It has a cash-out limit of Php 50,000 per day, 250,000 per month and 400,000 per year.
Want a tutorial on how to register to Coins.ph? You may check out this post: Tutorial: How to Install and Register an Account in Coins.ph
Table of Contents
Why Perform KYC to Verify Your Coins.ph account?
Similar to upgrading a GCash or PayMaya account, you have to undergo the KYC (Know Your Customer) procedure to verify your Coins.ph account.
Bangko Sentral ng Pilipinas (BSP) requires the KYC verification process for the security of a financial app’s customers. Coins.ph has to make sure that your IDs are accurate and unexpired.
On the other hand, you have to prove as a customer that you are the person you are claiming to be based on the details you have submitted to Coins.ph.
The KYC ensures that transactions through the Coins.ph app or to its linked apps are safe and secure. This way, we can be sure that app users, especially those using the advanced features of Coins.ph, are verified and legitimate users.
Step 1 – Prepare a Valid ID to Verify Your Coins.ph Account
Before you verify your Coins.ph account, it’s best to prepare the ID that you want to use.
You must take note of the following:
- Philhealth, TIN and Voter’s IDs will not be accepted
- Your ID must have at least 1 month before expiration
- Your ID must show your birthdate
You may select from the following list of IDs:
Recommended IDs:
- Unified Multi-Purpose ID (UMID)
- Driver’s License
- Professional Regulation Commission (PRC ID)
- NBI Clearance
- Postal ID
- Police Clearance Certificate
Other IDs :
- AFP ID
- Alien Certificate of Registration
- Bureau of Fire Protection ID
- GSIS e-Card Plus 2
- IBP ID
- Integrated Bar of the Philippines ID
- NCWDP Certificate
- OWWA ID
- Passport
- Philippine National Police ID
- SSS Card
- Seamans’ Book
Aside from the ID, you should also prepare an ID number from this government IDs: SSS, GSIS and TIN.
Step 2 – Log in to Your Coins.ph Account
Take time to think about and prepare your ID. Make sure that it’s not yet expired and the details are still updated. Once your ID is ready, it’s time to log in to your Coins.ph Account.
Step 3 – Open the Coins.ph Main Menu
The main menu button is located at the upper-left corner of the Coins.ph dashboard. Tap it to display the submenus and buttons available including VERIFY NOW.
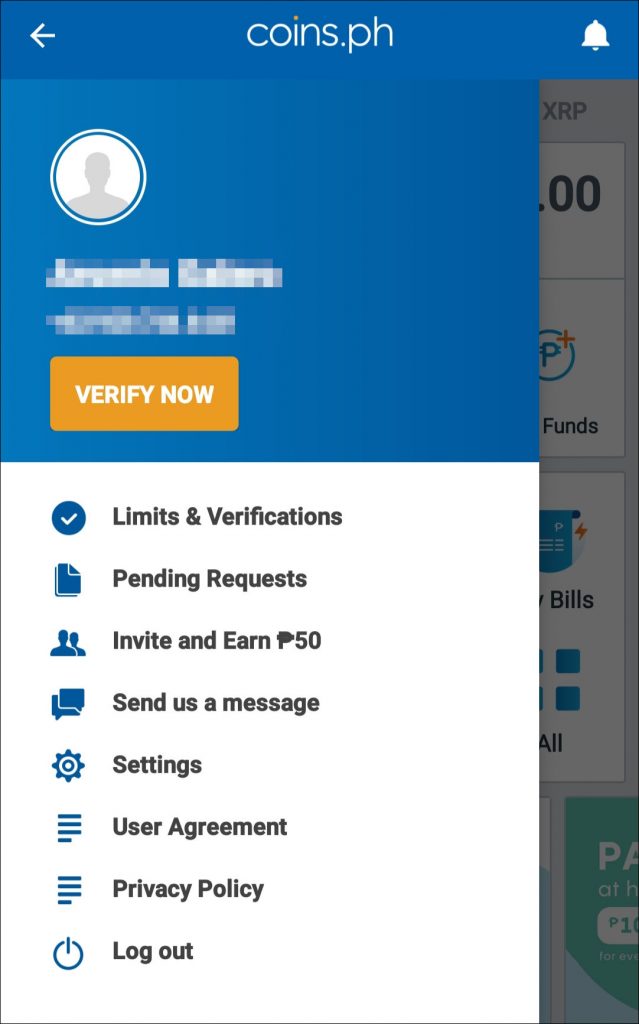
Step 4 – Tap VERIFY NOW
VERIFY NOW button is the topmost button just below your name and registered mobile number. Tapping this will redirect you to the Limits & Verifications screen. Permission notification will display. Just select Allow.

You can also start the verification thru the following alternatives:
- Tapping on the Limits & Verifications submenu. It is located in the main menu just below the VERIFY NOW button
- Selecting a feature in the Coins.ph dashboard such as Pay Bills or Convert. A pop-up message will display stating the following: “Take a clear photo of yourself. To use this feature, please take a quick selfie. To meet BSP regulations, we must collect a selfie from each customer.”
Step 5 – Select your language
Here, you have to select the language that you want to use for the verification process – English or Filipino.

Step 6 – Answer the question “First time signing up?”
Why Coins.ph is asking this question? The reason is that an account is not transferable and a user is only allowed to have 1 ID and selfie-verified account. For example, if you have 2 accounts, you may choose which account you want to be ID and selfie verified.
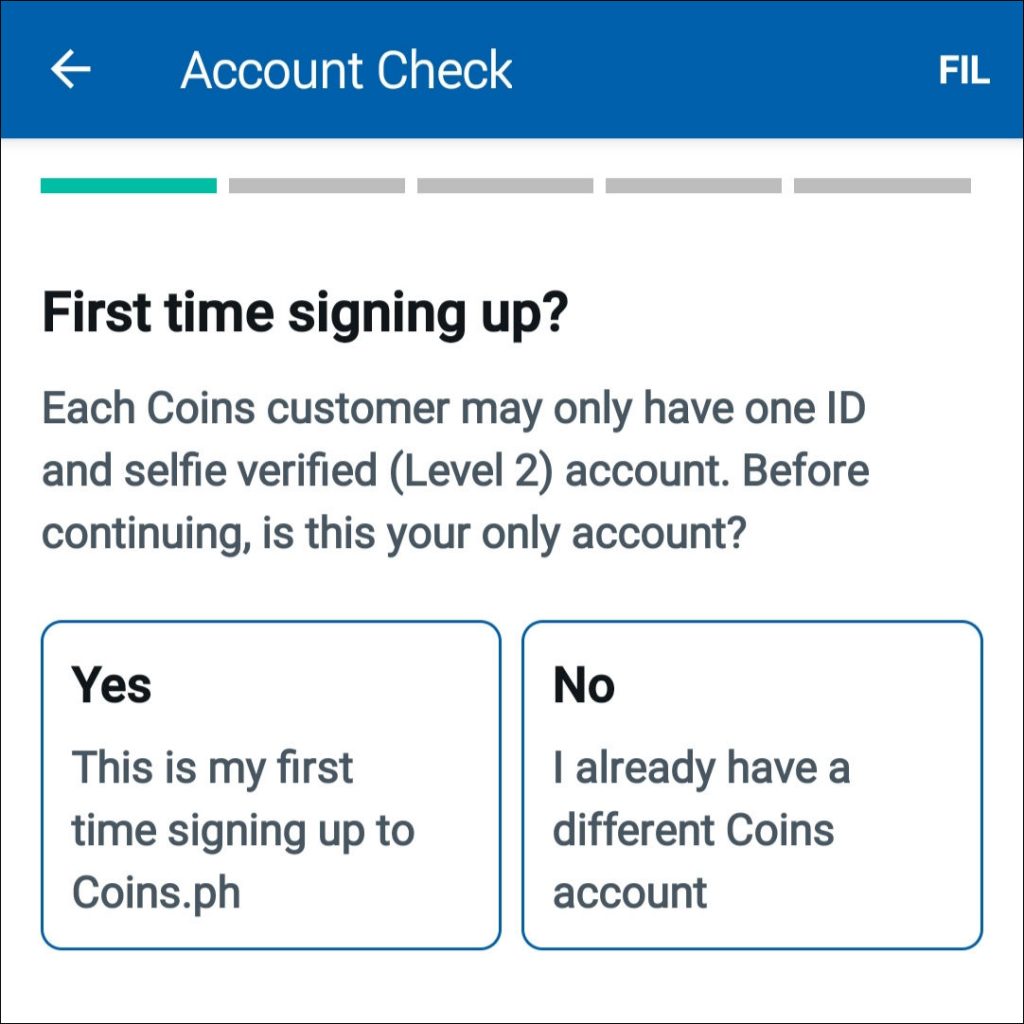
Since this is my only account, I tapped on “Yes. This is my first time signing up to Coins.ph.”
After tapping ‘Yes’, another pop-up message will display stating that the following will be required: SSS / GSIS Number and valid government ID.

Tap NEXT on the above pop-up message.
Step 7 – Select the ID that you will upload
Here, you will have to select the valid ID you have prepared in Step 1. For this step, I tapped Driver’s License.

After tapping it, what will display next is the Identity Verification screen.
Step 8 – Enter the Details of Your ID
In the Identity Verification screen, you have to enter the following details:
- ID Number
- Where was your ID issued?
- On what date was your ID issued?
- ID Expiration Date

TIP: If you don’t know the date your card was issued, it is marked with a red box in the sample ID displayed at the bottom part of the screen. This is very helpful if this is not really that visible like in the Driver’s License.
Once you have filled in the ID details, tap NEXT. A new Identity Verification screen is displayed where you can upload your ID (Front and Back).
Step 9 – Upload your ID
Here, you have to upload 2 photos of your ID, 1 for the front and the other for the back of the ID.
You have 2 methods of doing this:
- Taking a photo – This is the first method that I have done; however, I did not see any option to crop the image. I finally resorted to the next method.
- Choosing from Gallery – if you have existing images of your IDs or you just found this method convenient (like me), you may choose this option.
Tap on ‘Upload Front ID Image‘. The above-mentioned methods will be displayed.

Once you took a photo of your ID or uploaded it from the gallery, the image will automatically be uploaded. Uploading will take a few seconds depending on your internet speed.
TIP: Carefully check the ID images that you uploaded. You can change an image by uploading a new one if you’re not happy with it. Coins.ph also displays the following for your to check:
- Should be a valid unexpired government ID
- All 4 corners are showing
- The text should be clear
Once you are done with uploading the images, tap NEXT. This will display the General Information screen.
Step 10 – Enter details in the General Information Screen
In the General Information screen, you have to enter the following details:
- Gender
- Country where you were born
- SSS, TIN or GSIS Number

Tap NEXT once you’re done with the above. This will open the Source of Funds screen.
Step 11- Enter Source of Funds details
In the Source of Funds screen, you can read the following statement: “To comply with local regulations, we need to understand the source of the money you will use in your Coins account. Please be as specific as possible. It will help us verify your account faster!”
You will need to provide the following details:
- Employment status
- Industry are you in?
- Name of your employer or your company?
- Your job title or position?
Tap NEXT.
I was expecting that the next step would be selfie verification and it should be automatic. However, tapping NEXT displayed a notification that the ID submission was successful. Please continue with the next step.

Step 12 – Perform selfie verification
To do a selfie verification, go to the Limits & Verifications screen. (To do this, tap the main menu button located at the upper-left corner of the Coins.ph dashboard. This will display the submenus including Limits & Verifications. Tap Limits & Verifications).
In the Limits & Verifications screen, look for the Level 2 > Selfie Verification label.
Tap the VERIFY button next to the Selfie Verification label. This will display the screen where you can take your selfie.

TIP: Remember to follow the instruction:
“Hold up your ID and tap the button to take a photo of your face.”
Step 13 – Upload Your Selfie to finally Verify Your Coins.ph Account
After you took your selfie while holding your ID, you have the option to retake it or upload.
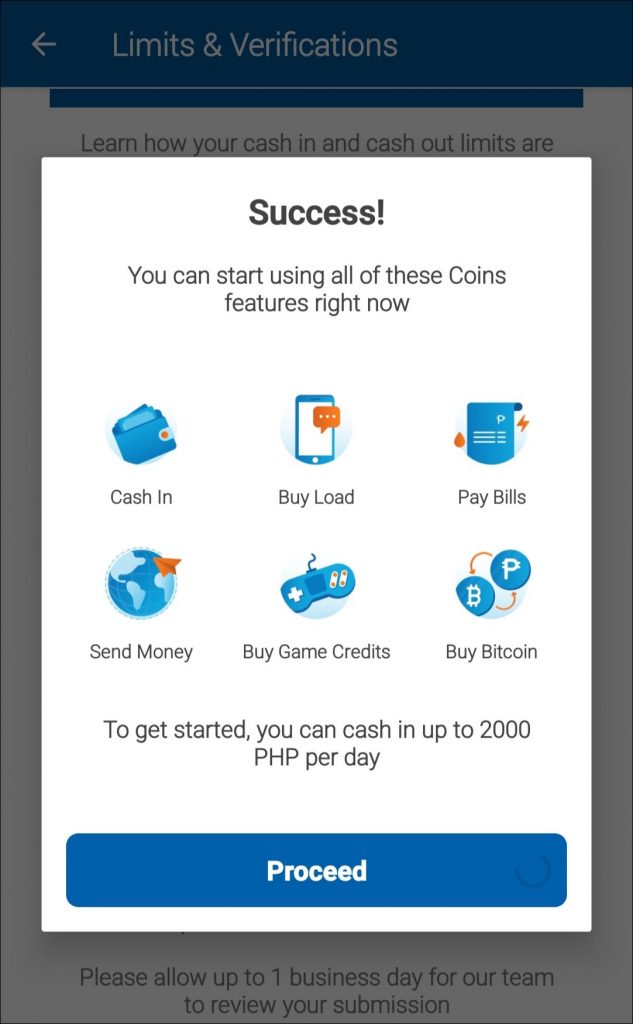
Tap UPLOAD once you’re okay with your photo. This will display a notification that uploading is successful. You can now start using the following features: Cash In, Buy Load, Pay Bills, Send Money, Buy Game Credits, Buy Bitcoin. You can also now cash in up to 2000 per day.
You’re done!
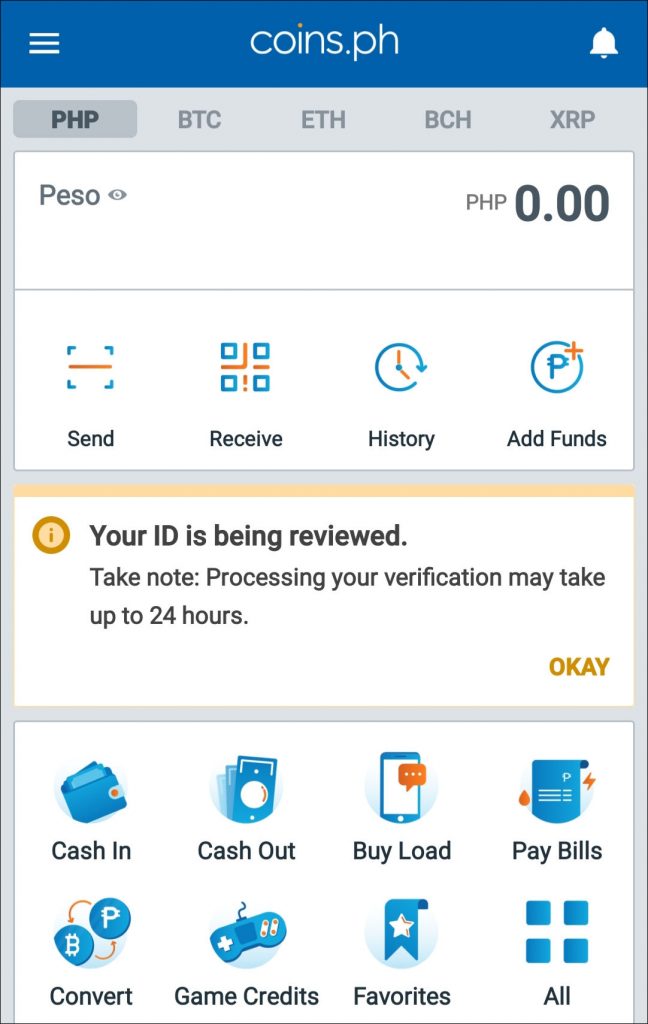
When you go back to the Coins.ph dashboard, a message is displayed stating:
“Your ID is being reviewed. Take note: Processing your verification may take up to 24 hours. (OKAY)”
Conclusion
I wrote the draft of this blog post in just a few hours after I performed the above steps. It took less than 1 day – just around 16 hours – for the ID and selfie verification to be approved. It’s quite fast considering that it has to be reviewed and it’s a weekend, not on a business day.
I received the following SMS messages:
“We have approved your ID verification! If you have also completed your selfie verification, you may now user Coins.ph to cash-in and cash-out with higher limits.”
“We have approved your selfie verification! If you have also completed your ID verification, you may now user Coins.ph to cash-in and cash-out with higher limits.”
The first transaction that I did? I cashed in to Coins.ph from my GCash account! How amazing is Fintech! Mobile wallets are integrated and it’s so cool!
You may also try the different options available to cash in to Coins.ph depending on your needs.
There might also be situations when you have to send bitcoin via Coins.ph. This is an amazing feature of Coins.ph that’s very useful when other methods of sending money are not available.
To know more about Coins.ph, you may check their website: Coins.ph


2 Responses
[…] Want to know how to ID and selfie verify your Coins.ph account? You may check out this guide: How to Verify Your Coins.ph Account […]
[…] Once you have registered, you should upgrade your account to be avail of the many features of Coins.ph. You may check out this post: How to Verify Your Coins.ph Account. […]