How to Cash In to GCash Using your BPI Account
Do you know that it is very easy and convenient to cash in to GCash using your BPI account?
Personally, this is my first option among the many methods to cash in to GCash.
I have an existing account and BPI branches are located in many parts of the country.
BPI is the first bank in the Philippines and Southeast Asia. Today, it is one of the leading banks in the Philippines. It has over 900 branches in the Philippines, Hongkong, and Europe.
In this post, I’m going to share with you the step-by-step guide on how to cash in to GCash using your BPI account. It’s fast, convenient and most of all, free of charge!

I have tried 2 ways of cashing in through BPI, one from the BPI Android app itself and the other one thru GCash.
I found the former more secure as it does not require linking to GCash; however, I think cashing in from BPI using the GCash app is more convenient.
If you don’t have a GCash account yet, you can register thru this link: CREATE A GCASH ACCOUNT.
You may also check this post on how to register a GCash account: Tutorial: How to Install and Register an Account in GCash.
Table of Contents
A. Cash in to GCash using the BPI mobile app
Step 1. Log in to your BPI account
Step 2. Open the BPI app main menu
The main menu button is located at the upper-left corner of the BPI dashboard. Clicking this will display the different submenus of the app.
Step 3. Select Payments/Load
Selecting Payments/ Load submenu will display the following options:
- Pay Bills
- Load Prepaid Phone
- Load Other Prepaid
- Load E-Wallet

Step 4. Select Load E-Wallet
This step will open the Load E-Wallet screen where you have to fill in the necessary details.

Step 5. Enter the following details:
Load from – Here, you should select the BPI account that you are going to use in cashing in to GCash.
Load to – When you select the wallet icon (looks like a book to me hahaha) different options will be displayed. Select GCash. (The other options are PayMaya, Beep, EasyTrip, and AutoSweep RFID).

Reference Number – Enter your 11-digit mobile number here.
Load amount – Enter the desired cash-in amount.
Notes – An optional field if you want to add notes or remarks.
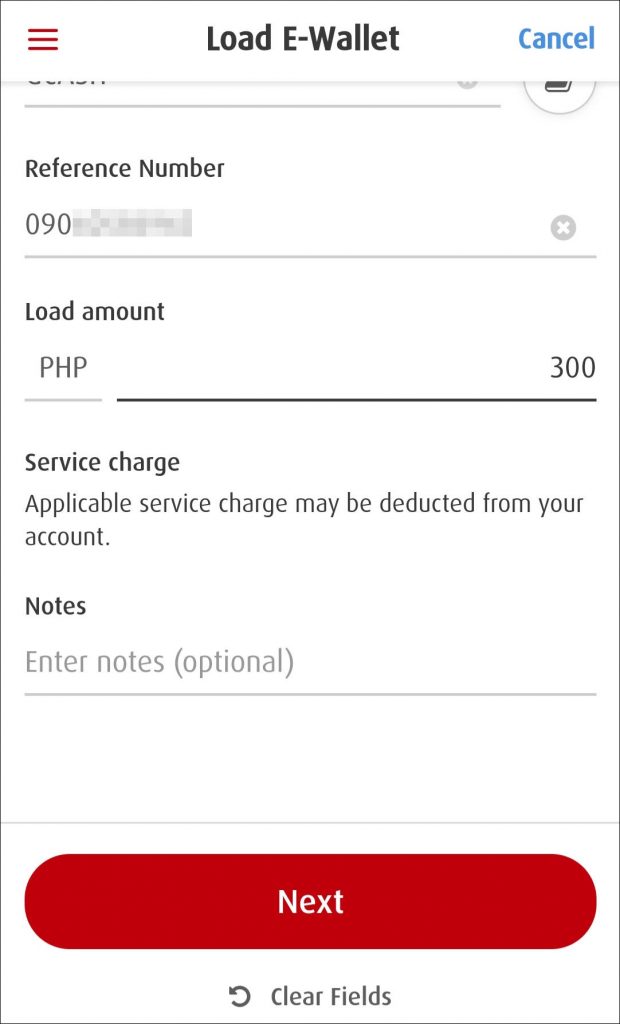
Step 6. Tap Next
This step will open the Load E-Wallet Confirmation screen (Step 2 of 3 – Review Details). Check if the details such as source account, amount or mobile number are correct.
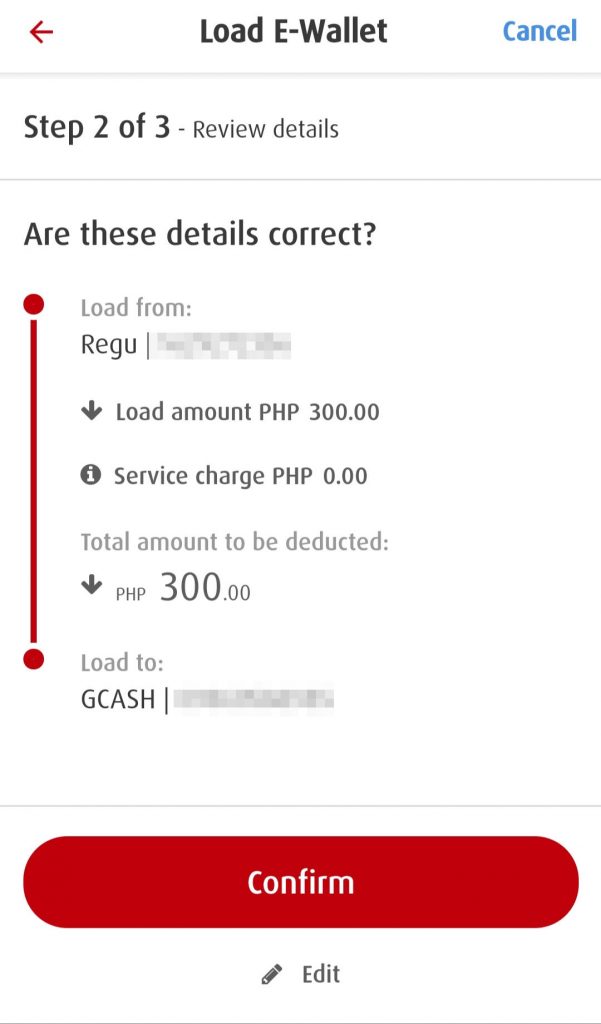
Step 7. Tap Confirm
This will display the One-Time PIN screen. You have to check here if the phone number where the OTP will be sent is correct. Some digits are hidden to protect your data.

Step 8. Tap ‘Yes, send me the code‘
An SMS with the OTP will be sent to your registered mobile number:
“Your One-Time PIN is <6-digit PIN>. Enter this code to confirm reload of PHP 300.00 to GCASH with reference number XXXXXXXXXXX. For your protection, do not share this code with anyone.’
Step 9. Enter the OTP
If the OTP was not sent, you have the option to tap Resend code via SMS.

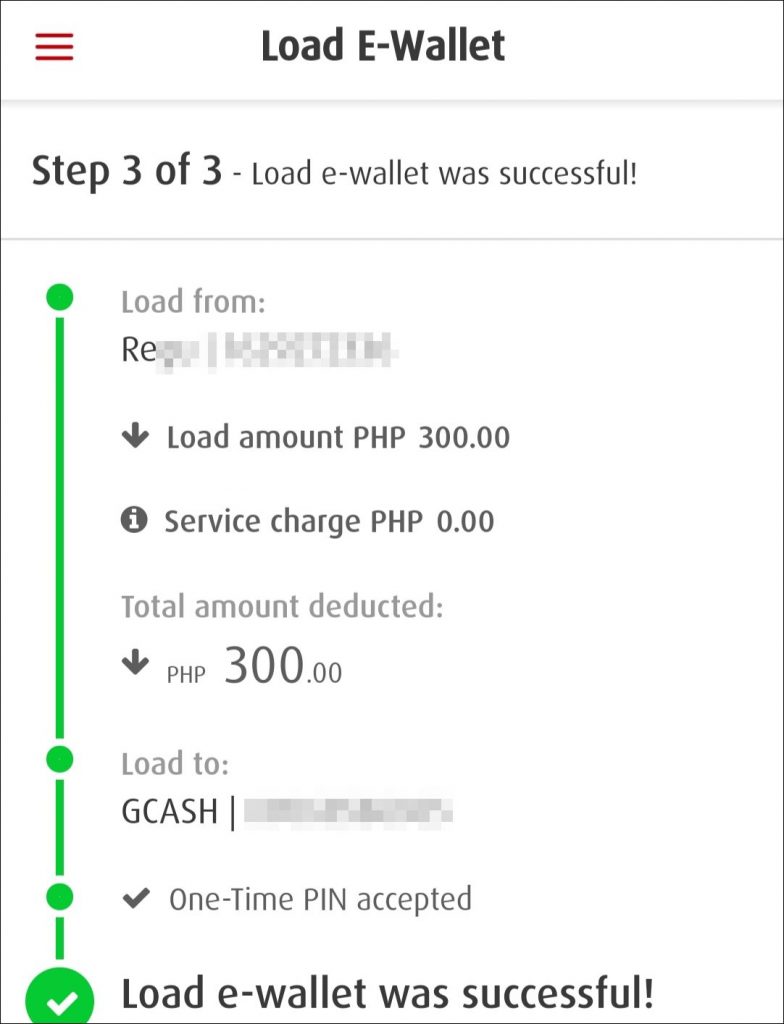
Step 10. Tap ‘Submit‘ to finally cash in to GCash
A confirmation screen will display stating that loading the GCash mobile wallet was successful. This contains the source account, Cash-in amount, GCash number, transaction date and time and the Confirmation Number. Note that there is no service charge for this transaction.
B. Cash in to GCash via BPI
Step 1. Link your BPI account to GCash
a. Click the GCash main menu
The main menu is located at the upper-left corner of the GCash dashboard. Tapping it will open the submenus including My Linked Accounts, GScore, Promos, etc.

b. Select My Linked Accounts
This will open a list of accounts that you can link to GCash such as GCash Mastercard, American Express Virtual Pay, PayPal, My Bank Cards, BPI Account, and UnionBank.

c. Select BPI Account
This will display the BPI Authentication page. On this screen, you will have to read and accept the terms and conditions along with your BPI Account Username and Password:
“…When deemed necessary by BPI, it may require additional verification, such as, but not limited to, sending a One-Time PIN via SMS to your BPI-registered mobile number prior to effecting your BPI Online Banking account transaction/s in accordance with BPI’s Terms and Conditions.
BPI will not share any of your account information (including personal data) with any third-party except in accordance with BPI’s Terms and Conditions…”

d. Enter Username and Password
Make sure to enter the correct Username and Password.
e. Tap Accept
This will display a page confirming that linking of your BPI account to GCash is successful.

Step 2. In the GCash dashboard, select Cash In
This will display the Cash In screen.
You will notice that after the registration, BPI is now included in My Linked Accounts section.

Step 3. Select BPI
This will open the Cash In via BPI screen where you can enter the desired amount that you want to be added to your GCash account. This is also where you can select the BPI account where the amount will be deducted from.

Step 4. Enter the amount to cash in
Make sure that you entered the correct amount that you want to be cashed in.
Step 5. Select the BPI account
If you select an account, the checkmark will become blue while the unselected will remain gray.
Step 6. Tap Next
This will open the Confirmation screen where you can check the amount before proceeding with the transaction.

Step 7. Tap Confirm
After tapping Confirm, a new screen will display where you have to enter the authentication code sent to your registered mobile number.

Step 8. Enter the authentication code
If the SMS is not sent, you may request another authentication code by tapping Resend Code.
Step 9. Tap ‘Submit’ to finally cash in
This will display a confirmation message that the transaction is being processed. Once successful, an SMS will be sent to your registered mobile number. In my experience, this only takes a few seconds.
The SMS states “You have received <amount> on <date and time> from BPI account ending in <last 4 digits of your BPI account>. Your new balance is <GCash balance> with Ref No. <Ref No>. Thank you for using GCash!”

Conclusion
There are a lot of ways to cash in to GCash. The convenience depends primarily on your available resources and accounts.
Personally, cashing in thru the GCash app by linking the BPI account is one of the easiest and most convenient methods of adding funds to GCash. This is because I have an active BPI account that is very much accessible to me via its mobile app.
How about you? What’s your favorite method of cashing in to GCash?


2 Responses
[…] Link […]
[…] Now that you have finally registered an account with GCash, you can now enjoy its features such as loading your own phone. However, before you can do that, you need first to cash in to GCash. There are various ways of funding your account. One of the most convenient ways of funding your account is to cash in via BPI. […]