ING Philippines: Start Saving with this Fully-Digital Bank

Do you have savings in traditional banks with less than 1% per annum interest rate? Are you looking for a way to park your savings that would yield higher interest rates? Well, you have just landed in the right place! In this post, I’m going to show you how to open an account and start saving with ING Philippines.
ING Philippines is touted as the first all-digital bank that started its operations in the country in 1990. It is part of a global network of banks that has presence in over 40 countries and has over 38 million customers.
Just like any other digital bank, creating an account is very easy. You can open an account anywhere you want and even in the comfort of your home. Time is also not an issue as you can do it anytime. All you need is a valid ID, create an account, and verify.
Table of Contents
A. Features of ING Philippines
All-digital banking – All ING Philippines bank transactions including opening an account, adding funds, and withdrawals are performed via the app. No need to go to a physical bank for any transaction that you want to do.
High-interest rate – The base interest of ING Philippines is 2.5%. This is at par with the rates that traditional banks can provide to their clients. The rate can go as high as 4% as most of the time, ING Philippines has a promo especially for new customers. Currently, new customers have a 4% interest rate p.a. for the first 3 months. (Note that this promo is at the time of writing of this post. You may check the official social media accounts of ING Philippines for updates.)
Check deposit – This is a unique feature of ING Philippines. If you have checks that need to be encashed, you can now do it thru the digital app.
Bank Statement – ING Philippines provides bank statements to clients.
ING Save and ING Pay – these are the 2 accounts that you can open right now in ING Philippines.
B. What is ING Save and ING Pay?
1. ING Save
ING Save is the account that you can open to save your money in ING Philippines. This is actually the first account that users can create by default.
Just like other digital banks like DiskarTech and CIMB, this savings account is fully digital and can be performed via the mobile app.
As mentioned in the section above, the base interest rate is 2.5% p.a. You can earn 1% gross p.a. if the available daily balance is above Php 20,000,000.
Also, there is no minimum available daily balance requirement for your money to earn interest.
2. ING Pay
ING Pay, as the name implies, is the account that you can use if you plan to pay your bills by using the ING Philippines app.
With this feature, you can pay your bills such as credit card, insurance, and others. You can also transfer funds from ING Philippines to other banks and e-wallets via InstaPay and PESONet.
C. Requirements to open an ING Philippines account
You need the following to open an account: a valid email address, a mobile number, valid ID, and signature.
For the valid ID, you need any of the following:
- Driver’s License
- Old Philippine Passport (Issued before August 15, 2016)
- New Philippine Passport
- Unified Multipurpose ID
For the signature, it is good to prepare it beforehand. Write it with dark ink on white paper. You have to take a photo of it after filling in the details when opening an account. This is like affixing your signature when opening an account in a physical bank.
D. How to open an ING Philippines account (ING Save)
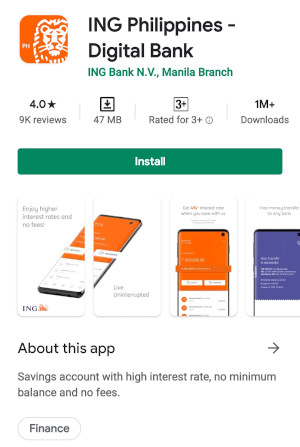
1. Install the ING Philippines – Digital Bank app
The first thing to do is of course install the ING Philippines – Digital Bank app on your mobile phone. Once installed, open the app and allow permissions like photos, media, files, device location, and phone calls.
After opening the app, you may swipe thru the promoted features of ING Philippines before going to the next step.
2. Read and agree with the ING Philippines Privacy Statement
This will open the Open an account screen with ING Philippines privacy statement which you need to agree with. Read and scroll down up to the bottom of the screen.

3. Create your account and provide primary information
In this screen you have to provide the primary information such as the following:
Legal Name – It is very important that you provide the same details as they appear in the ID that you are going to use. Tap Next when done.
- Given Names
- Middle Name
- Last Name

Email address – Make sure to enter the correct email address. Tap Next when done.

Mobile number – This will become your registered mobile phone number. ING Philippines will send a verification code to this number so make sure you’re entering the correct one. Tap Next when you’re done and wait for the SMS containing the ING Verification Code.

4. Enter verification code
Enter the 6-digit code you have received via SMS. Once you entered the code, you will automatically be redirected to the next screen where you have to set up your passcode.
5. Add and confirm your passcode
Enter the 5-digit passcode. Make sure to take note of this passcode and find ways to remember it for future logins.

After entering the passcode, you have to confirm that it’s correct in the next screen.
In this screen, you have the option to allow the fingerprint feature for logging in. You may skip this if you want.
E. How to verify your ING Philippines account (ING Save)
1. Tap YES, IT’S ME
After setting up the passcode, the next screen is Verify Identity. This is the first screen for verifying your ING Philippines account.

You can read here some tips on performing the verification such as allowing the app to access your phone’s front camera, avoiding white backgrounds, making sure that no other faces are seen in the background and no items are covering your face.
2. Allow permissions for ING Philippines
After tapping Yes, It’s me, a pop-up message will display: “Allow ING to take pictures and record video?” Just tap Allow.
3. Take a selfie
Just follow the simple instructions here such as face the camera, blink, and nod up and down.

4. Select document type
In the Select document type section, you need to select the ID or document that you want to submit to ING Philippines.

5. Take a photo of your selected ID
For most apps, this is where I find it tricky. Capturing ID details is not yet perfected by most apps so you have to make sure that you take a very clear picture of your ID.
In this screen, ING Philippines provides suggestions such as placing the ID on a dark surface, making sure the flash of your camera is off and the ID surface has no glare.

Again, make sure to take the picture properly. Your verification might be on pending status if the app fails to read the details in the ID. This happened to me so I have to do it again the next day.
6. Provide detailed information
For this section, you have to fill in the details required by ING Philippines.

- ID and Birth information. The needed details here are your ID number, expiration date, birth date, birthplace, gender, and nationality.
- Residential and mailing address. For the mailing address, it is the same as the residential address, just tap the option “Same as my residential address.
- Work information. Required details here are your employment type, company name, industry, and work designation.
- Financial information. Provide here your source of income and gross annual income range.
- Tax information. This defaults to the Philippines.
- Purpose of relationship. You just have to select here the reason for opening an account with ING Philippines.
- US person information. ING Philippines asks if you have a US residency/ citizenship, tax identification number, residence, telephone number, or postal address. If none, there is an option “I do not have any of the above records in the USA.”
7. Take a photo of your signature
As mentioned above, you have to write your signature using dark ink on a piece of white paper, then take a photo of your signature.

8. Review the details that you have provided
Here, you have to double check the details that you have provided to ING Philippines.
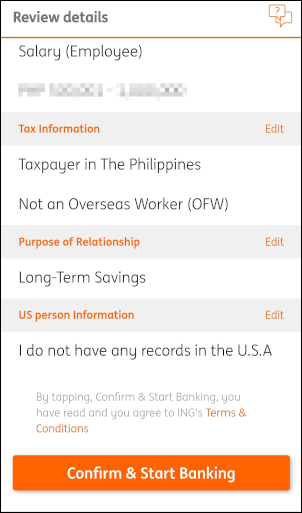
9. Tap Confirm & Start Banking
After confirming that all the details are correct, this will be submitted to ING Philippines for review. A pop-up message will display stating:
“Thanks! We are reviewing your application and will notify you in 3-5 working days.”

F. How to open an ING Pay account
Once your ING Philippines account has been successfully created and verified, you can now easily create an ING Pay account.
To open an ING Pay account, no need to do the above steps anymore. Just a few taps on the app and you’re done! That’s how fast the process is.
1. Log in to your ING Philippines account
In the Accounts screen, you will see that the first entry is the ING Save account. Below this is the Add Account option.
2. Tap Add Account in the Accounts screen
This will open another screen that asks “Which account would you like to open?” The account displayed is ING Pay by default.
3. Tap Add Account
This will display a confirmation message stating: “Yay! You can start using your Pay Account! Bills payment. Virtual Visa debit card. Free fund transfer. (Got It).”
Congrats! You now have your very own ING Pay account.
Just tap Got It and you will see that the ING Pay account is added to the app along with your existing ING Save account.
Final Thoughts
Nowadays, with the rise of digital banking as part of consumer Fintech in the Philippines, there are no more excuses for not starting your saving journey.
Instead of going to physical banks to open a savings account, you can do it just by using your smartphone at any place and on your preferred time.
With digital banks like ING Philippines, there’s no need to wait for your turn, to open an account on official banking hours, or to prepare an initial deposit amount. Awesome!
How about you? Are digital banks in any way helping you to save for your future needs? I hope so. I also hope that you find this post useful if you’re deciding to open an ING Philippines account or any other digital bank account.
If you need more info, you may visit the official website of ING Philippines.


Recent Comments